I had some feedback that whilst this was a useful post it was perhaps too long. So for those of you who just want the answers here is the TLDR
Also worth checking out this follow up piece which shows you how to fix a common error.
So to begin…….
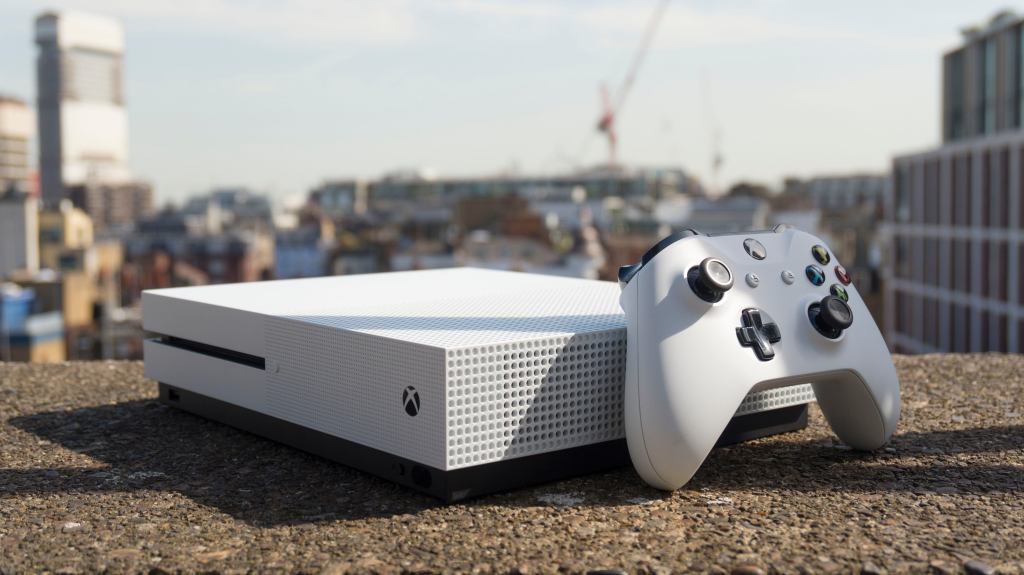
Like many parents, I wanted to get more life out of our aging Xbox One S—especially with the kids playing more games lately. What’s great is that many current-gen titles like Call of Duty, Fortnite, Destiny 2, Halo, and many others still run on this console. Rather than shelling out for a new console, I decided to upgrade the internal hard drive to a 2TB SSD. The goal? To expand storage for a wide selection of child-friendly titles, improve performance (even for older games), and make the console feel snappy again.
But what started as a simple upgrade turned into a journey through Xbox error codes like E106, E101, and finally E200. If you’re considering a similar upgrade, this post walks you through the entire process — from start to finish, including the detours and fixes that got me to success.
For most people this should be a very simply upgrade. Most SSDs are compatible, and the OSU tool from Xbox does seem to create the correct partions on the SSD without you needing to resort to running scripts to do so, but ive included all the steps I encountered here so hopefully it saves you some time.
Software & Tools You’ll Need
Here’s everything I used during this process, including download links:
- XboxOneHDD Script (partition tool) – To create Xbox-compatible partitions on the SSD
- OSU1 System Update File – The official Xbox Offline System Update from Microsoft
- MiniTool Partition Wizard Free – To extend the User Content partition and utilize all SSD space
- How to Format USB Drives to NTFS – Required format for the update USB
- Offline Update Instructions from Xbox – Step-by-step update instructions
- Xbox Error Solutions Reference – Lookup guide for errors like E101, E106, E200
- And finally the most useful tool of all…….ChatGPT. Tell the AI what you are doing and get it to walk through each step with you. If you encounter an error the chances are it will be able to suggest something to get you past it.
What I Bought
- SSD Model: Crucial BX500 2TB 2.5″ SATA SSD Buy on Amazon
- there may be cheaper alternatives but this is confirmed working for me.
- SATA to USB Adapter: Generic USB 3.0 to SATA adapter from Amazon
- Console: Xbox One S (original internal 1TB drive) Buy on Amazon
Step-by-Step: My Full Upgrade Process
1. Bought the SSD
I picked up a 2TB Crucial BX500 SSD, one of the more affordable but reliable options on the market. It’s 2.5″ SATA, which matches the Xbox One S interface.
2. Physically Installed the SSD
Opened up the Xbox One S (this voids warranty) and swapped out the old 1TB hard drive for the new SSD. Here’s a guide on how to open up your Xbox One S.
3. Initial Plan: Use OSU1 for a Fresh Install
My original plan was to install the Xbox operating system onto the new SSD using Microsoft’s Offline System Update (OSU1) method. This is the method Microsoft officially supports when recovering a console or installing a fresh OS onto a new drive.
Here’s how I approached it:
- Removed the SSD from the Xbox after physically installing it, and connected it to my PC using a SATA-to-USB adapter.
- Downloaded the OSU1 update file from the official Xbox website and extracted the ZIP.
- Ran the XboxOneHDD script on my PC to format the SSD with the correct Xbox-compatible partitions. (Note: in many cases, this isn’t required, as the Xbox OS installer can handle the partitioning automatically. I included this step in case your Xbox struggles with SSD recognition.)
- Copied the contents (not the folder itself) of the extracted
$SystemUpdatedirectory:- To the
System Updatepartition on the SSD - And also to a USB flash drive (formatted to NTFS) inside a folder named
$SystemUpdate
- To the
- Safely ejected the SSD and USB drive from the PC.
- Reinstalled the SSD back into the Xbox One S.
- Inserted the USB flash drive into the Xbox.
- Powered on the Xbox into recovery mode by holding Sync + Eject, then tapping Power (holding Sync + Eject until the troubleshooter appears).
- Selected Offline System Update.
This should have worked—but it didn’t. Here’s where the errors began.
- Ran the XboxOneHDD script on my PC to partition the SSD correctly
- Copied the contents of the
$SystemUpdatefolder:- To the
System Updatepartition on the SSD - And to a USB stick (formatted NTFS) in a folder named
$SystemUpdate
- To the
- Formatted the USB stick to NTFS
- Booted the Xbox into recovery (Sync + Eject + Power) and chose Offline System Update
4. First Setback: Error E106
After powering on the Xbox with the newly installed SSD and USB stick, I was expecting the update to begin smoothly. Instead, I got hit with Error E106, which is a startup failure. This meant the Xbox couldn’t boot from the SSD.
At first, this was worrying—but E106 is usually just a sign that the console doesn’t see a valid OS yet. It doesn’t necessarily mean the drive or the Xbox is faulty.
What I did:
- Powered off the Xbox
- Reconnected the SSD to the PC
- Double-checked the
System Updatepartition to ensure the OSU1 files were placed correctly in the root - Verified that I had not accidentally left the
$SystemUpdatefolder inside another folder on the USB
Once I confirmed that everything was in the right place, I reinstalled the SSD and tried again.
Make sure your System Update partition on the SSD looks like this:
System Update\
  updater.xvd
  system.xvd
  host.xvd
  ...etc
But still, the next issue appeared…
5. Fixed File Placement, Then Got E101
Even after checking everything, the next attempt ended in Error E101, which usually means the Xbox is rejecting the system update version or can’t validate it.
This confused me, because I had just downloaded the OSU1 zip from the official Xbox site. That’s when I started digging deeper into what version the console expected versus what OSU1 was providing.
Here’s how I investigated:
- I reinstalled the original HDD (which still worked)
- Booted into the Xbox settings and checked the OS version
- That’s when I saw it…
6. Discovered the Real Problem: Insider Preview Block
The Xbox was enrolled in the Insider Program, running OS version 10.0.26100.4850 — which is newer than what OSU1 provides (as it only offers the latest public release, not preview builds).
⚠️ Because of this, the Xbox refused to install the OSU1 files, resulting in the persistent E101 error.
If you’re reading this and your Xbox was in the Insider Program, you must unenroll before the offline update will work.
7. Reinstalled the Original HDD and Left the Insider Program
This step saved me.
- I removed the SSD and reinstalled the original Xbox hard drive.
- Booted into the system as normal.
- Opened the Insider Hub app (you may need to download it from the Store).
- Went into Settings > Manage Devices and unenrolled the console.
- After a reboot, the Xbox downloaded and installed a ~4GB system update.
- After restarting, the OS version was downgraded to the latest retail version:
10.0.26100.4026.
✅ This meant I could now successfully install OSU1 on the SSD.
- Reinstalled it
- Booted the console
- Opened the Insider Hub app and unenrolled the console from all previews
- The console downloaded a 4GB update
- After reboot, the OS version was downgraded to the latest public build:
10.0.26100.4026
8. Re-prepped the SSD
Now that the console was unenrolled from Insider builds, I gave the SSD a clean start.
- Connected the SSD to my PC via SATA-to-USB adapter again
- Re-ran the XboxOneHDD script to wipe and recreate the correct partitions
- Re-downloaded a fresh copy of OSU1 from Microsoft
- Copied the OSU1 file contents again to both:
- The
System Updatepartition on the SSD - A USB stick formatted to NTFS with a
$SystemUpdatefolder
- The
This time, I double-checked file placement carefully.
9. Tried Offline Update Again… Then Hit E200
With all the right pieces in place, I attempted the offline update one more time.
The update seemed to be working—progress bar reached near the end of Step 3—until suddenly: Error E200.
This error usually signals a failed boot after a system update or a partially applied update.
At this point I was pretty frustrated. The files were right, the OS matched, the SSD worked… so why?
It turns out, the OS had mostly installed, but something glitched in the final boot. The fix? A factory reset.
10. The Unexpected Fix: Factory Reset
From the Troubleshooter menu (accessed again with Sync + Eject + Power), I chose:
Reset this Xbox > Keep games and apps
After a few minutes, the Xbox completed the reset and rebooted cleanly into the setup screen.
🎉 Success! Everything was now working as intended.
Reset this Xbox > Keep games and apps
That worked! After a few minutes, the console rebooted and completed the setup process successfully.
Post-Install Checks
- OS Version:
10.0.26100.4026(confirmed retail build) - Storage: 1.8TB usable space
- Performance: Noticeably improved load times
- Purpose: Console is now ready with loads of downloaded kid-friendly games and better speed
Expanding the User Content Partition to Use Full SSD Space
After everything was installed and running, I noticed that not all of the SSD’s 2TB capacity was being used. Around 100GB was left unallocated. Here’s how I expanded the User Content partition to use the full space:
- Download MiniTool Partition Wizard Free
- Remove the SSD from the Xbox again and connect the SSD to your PC using a SATA-to-USB adapter
- Launch MiniTool, locate your Xbox SSD
- Right-click the User Content partition and select Extend
- Use the unallocated space (it should be visible at the end of the drive)
- Click Apply (top left) and let it complete
- Reinstall the SSD into the Xbox One S and boot
Here’s what it looks like in the tool:

This gave me the full 2TB space available for game installs.
Summary Table of Errors and Fixes
| Error Code | Meaning | What Fixed It |
|---|---|---|
| E106 | Boot failure | Correct OSU1 file placement |
| E101 | OS mismatch | Leaving the Insider Program |
| E200 | Update failed near completion | Factory reset via Troubleshooter |
Helpful Links and Resources
| Link Description | URL |
|---|---|
| Xbox Error Solutions | https://support.xbox.com/en-US/xbox-one/console/startup-error-solution |
| OSU1 Download (Offline Update File) | http://www.xbox.com/xboxone/osu1 |
| How to Format USB Drive to NTFS | https://support.xbox.com/xbox-one/system/format-flash-drive-to-ntfs-windows |
| Xbox Offline System Update Guide | https://support.xbox.com/en-GB/help/hardware-network/console/offline-system-update |
| How to Open the Xbox One S | https://youtu.be/v2nhbdxareU?si=Yxft1K6f7ZYxazZ3 |
Final Thoughts
This wasn’t the easy plug-and-play SSD upgrade I hoped for, but I’m glad I stuck with it. The key lesson? Check if your Xbox is in the Insider Program before replacing the drive.
Now the Xbox One S has:
- Double the storage
- Faster performance
- A new lease on life as a kids’ game hub
The Crucial BX500 2TB SSD worked great in the end. Just be ready for a few bumps if you’re switching from an Insider build.
If you’re planning to upgrade your Xbox One S, I hope this guide helps you dodge the pitfalls I hit. Let me know if you run into similar issues!

Leave a reply to CannonballCO Cancel reply