If you read my original blog post about upgrading the internal storage of an Xbox One S with a 2TB Crucial BX500 SSD, you might remember that after a bit of troubleshooting, everything was running smoothly: faster load times, tons of space for games, and a snappy experience for my kids.
But a month later, trouble returned.
After the next Xbox system update rolled out, the console failed to install it, throwing up a new error: 0x80070070 0x00000000 0x90070006 — a frustrating problem caused by the system update partition running out of space.
This post is a quick guide on how I fixed it, how you can avoid this happening after your upgrade, and what to do if it already has.
What Went Wrong?
Even though I let the Xbox create the partitions itself when I first installed the SSD and used the official OSU1 offline update tool, the system update partition it created was right on the edge of being full. As system updates grow over time, the partition simply couldn’t handle the latest version.
This led to a failed update and a bricked console — again.
The Fix: Resizing Partitions with MiniTool
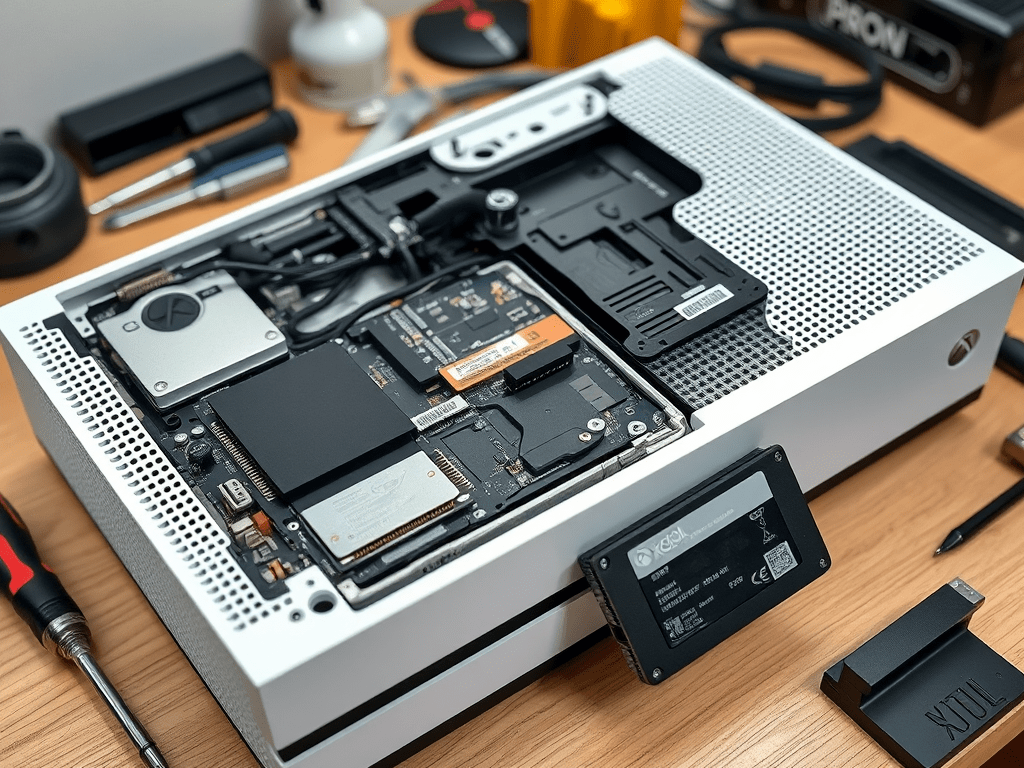
Thankfully, this problem has a straightforward solution if you’re willing to open up the Xbox and connect the SSD to a PC again.
Here’s what I did:
- Removed the SSD from the Xbox One S and plugged it into my Windows 11 PC using a SATA-to-USB adapter.
- Launched MiniTool Partition Wizard Free
- Located the SSD and visually confirmed that:
- The System Update partition was 100% full
- The User Content partition had 1600MB of free space
- Resized the System Update partition, giving it more breathing room (1GB+)
- Expanded the System Update 2, Temp Content, and System Support partitions slightly, just in case future updates use those too
- Shrunk the User Content partition slightly to make space for the above changes (still left 1600MB+ free, plenty for games)
- Applied changes and reinstalled the SSD into the Xbox
- Powered on the console — and the update completed successfully!
What This Means for You
If you’ve followed my guide and used OSU1 to initialize a brand new SSD, you may run into this same issue after a few months, especially as Xbox continues to increase the size of system updates.
To avoid getting caught out:
- After you complete your SSD upgrade, check the partition sizes in MiniTool
- Make sure the System Update and System Update 2 partitions have spare capacity (ideally 1GB or more)
- Expand them if needed before closing up your Xbox
Reference
If you haven’t yet upgraded your Xbox One S SSD, or want to know the full process, go read the original guide here:
That guide includes the complete install process, error code troubleshooting (E106, E101, E200), and how to get your console up and running again.
Final Thoughts
This is a small but important tweak that can save you hours of headaches later on. If you’ve already upgraded and run into update failures, don’t panic. A quick resize of your system partitions may be all you need.
The performance boost and extra space are still 100% worth it — just make sure your system has room to grow too.

Leave a comment